Wednesday 30 May 2018

Smile | Colour Blast


Hi everyone!
Popping in with my latest design team project for you. Today I have a mixed media scrapbook layout to share that I created for Colour Blast featuring Colour Artist Inks, Colour Paste, Colour Shimmer Spray and Colour Embossing Powder. I made this page to document when one of my boys lost his first tooth.


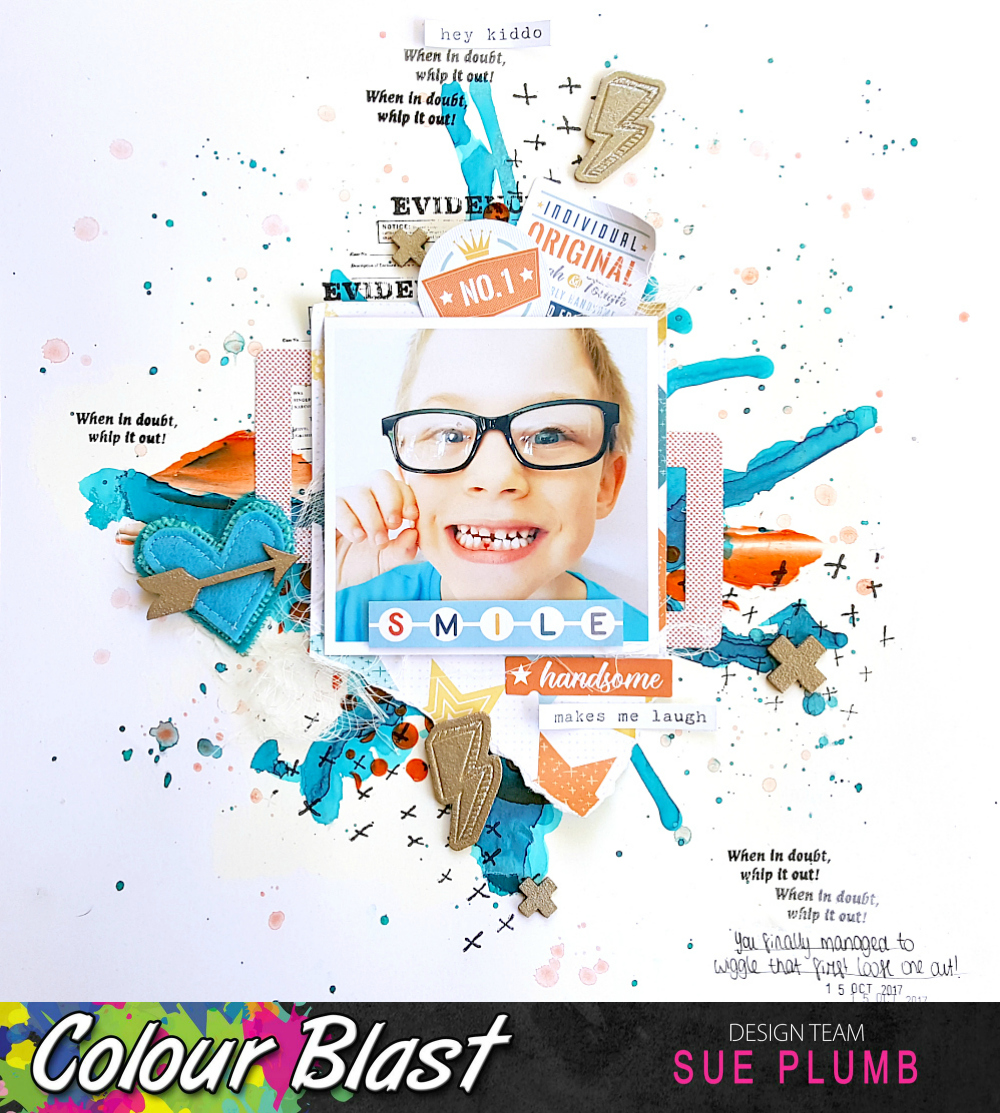
I started by prepping my cardstock with some white heavy gesso, so that I could move the inks around when I applied them. 

I then applied some 'Oasis' Colour Artist Ink using a brush to spread it around; then tilted my page in different directions to get the ink to run. I also used the excess ink on my brush to add some splatters, before drying it off with a heat gun. I then repeated the process using 'Marine' Colour Artist Ink, layering it over the top of the 'Oasis'. Again I dried with a heat gun, as I wanted the look of the water lines.


The next step in my process was to add some texture using Colour Paste and a Flutterby Designs stencil. I used 'Tangareen Dream' Colour Paste, as this provided a complimentary colour contrast to the blue inks I had used. Once I had applied the paste, I used a heat gun to dry it off.


At this point I decided my page didn't have quite enough splatters, so I used 'Tangareen Dream' Colour Shimmer Spray to add some more. (I simply took the nozzle out of the bottle and flicked it about.)

After I had added the extra splatters, it was time to add some extra depth to my page with some stamping. I used a couple of stamps from Viva Las VegaStamps, which I stamped directly over the top of my dry paste. (You can see how well it works if you ensure the paste is completely dry.)


With my background complete, I set my page aside and turned my attention to my embellishments. I had some wood veneer pieces from Cocoa Vanilla Studio that I wanted to use, and I altered them using Colour Embossing Powder. I chose 'Steel' as it gives a great chrome-like appearance and is a good choice for boy pages.


With my embellishments prepared, it was now time to add some papery layers to my page. I used Cocoa Vanilla Studio 'You Rock' papers and die cuts to create a layered mat for my photo.


I then added some frayed gauze before placing my photo on top; before sticking my title piece directly onto my photo using foam tape. Then it was simply a matter of adding my embellishments and some extra stamping around my page to finish it off. 


The small phrase stickers I used were also from Cocoa Vanilla Studio. 


The fabulous heart embellishment I used to layer under my embossed arrow was from Charms Creations.


Thanks for stopping by today so I could share this with you. I hope I have inspired you to pull out some of your Colour Blast products and get messy too!
Until next time, happy scrapping! X

Monday 28 May 2018

Space Girl Mail Art | Viva Las VegaStamps


Hi everyone!
Popping in today to share my latest design team project for Viva Las VegaStamps, and this time it's a mail art piece I have to share. I recently had a giveaway over on my Sue Plumb Designs Facebook page to celebrate {inter}National Scrapbook Day and needed to post the prize out to my lucky winner, so I figured why not kill two birds with one stone and use the box as an opportunity for some fun mail art.


I recycled a pizza box I had previously received scrapbooking supplies in, so I had some details on the front I had to cover up first, which I did quickly by roughly applying some Colour Blast black heavy gesso with a wide brush. I then cut an 8x8" piece of cardstock to use for my address label and stamped out my design.


I was dying to use one of the Space Girl stamps designed by Katy Paltridge (daughter of Fiona) from the new release plate #1501, and I chose some complimentary stamps to use along with it. I used the word Starbound and also the Grungey Strip of Stars which were both from the astrologically themed new release plate #1500. The final stamp I chose was the Sky of Stars Background, which has been one of my recent favourites. 


I then used a selection of Faber-Castell watercolour pencils and a water brush to add some colour to my images. (Using watercolour pencils is one of my favourite colouring methods for stamps - quick, easy, accurate, and I love the look of them.)


Once I had added all the colour, I adhered my label to the box using Miracle Tape and then used a white Sharpie pen to add some "star" detail and give it a "galaxy" appearance.


Then it was simply a matter of adding the recipient details to my label and then sealing over it with clear packaging tape to protect it.


Here's a list of the VLVS stamps I used:
- "Aquarium Space Girl" from plate #1501
- "Starbound" from plate #1500
- "Grungey Strip of Stars" from plate #1500
Sky of Stars Background

Thanks for stopping by so I could share this - I hope I have inspired you to get inky too! I will be back soon with another project to share. Until then, happy scrapping! X

Friday 25 May 2018

Super Boy | Scrap the Boys May Challenge


Hi everyone! 
The end of the month is fast approaching, so I thought I better pop in today to share my take on the May challenge at Scrap the Boys. This month the challenge inspiration involves some of my very favourite colours and it looks like this...


And here is what I created...

I took the opportunity to document some snaps I took of one of my boys down at our new local park. They installed a huge (and very tall) climbing frame which made my little Spiderman very happy indeed! (He didn't hesitate going straight to the top, quite unlike his twin brother who isn't fond of heights and prefers his feet placed firmly on the ground.)


To create my page, I started with the fabulous Crackle Background stamp from Viva Las VegaStamps for my background. I chose this stamp because the pattern reminded me of the ropes on the climbing frame. Then it was a matter of adding some colour. I reached for my favourite 'Oasis' and 'Lime' Colour Artist Inks from Colour Blast and simply applied them randomly with a brush around my page, allowing the inks to mix and pool in places.


Once the ink had dried I needed to create a layered mat for my photos. I gathered together a variety of materials - tissue paper; paper doily; mini paper bag; cotton thread; as well as some patterned paper, chipboard pieces and die cut ephemera from the 'You Rock' collection by Cocoa Vanilla Studio. I also added some cardboard to the back of my photos to pop them up a little higher. 


Alongside my photos I added an awesome denim and hessian star from Charms Creations which I topped with a Cocoa Vanilla Studio wood veneer arrow.


I then added my page title using a couple of CVS chipboard pieces and added a few stamped phrases to finish off my page.

Don't forget you have until the end of the month to get your take on the mood board linked up. There is a fabulous prize from Helmar up for grabs for our Australian winner and a guest designer spot for the international winner.
Visit the Scrap the Boys blog for all the details HERE
Until next time, happy scrapping! X

Monday 21 May 2018

We Stick Together | Flutterby Designs


Hi everyone!
I am here today to share my latest Flutterby Designs project with you and my very first using the BRAND NEW 'Happily Ever After' collection! This range is so freakin' awesome - and right up my alley with it's gorgeous bright colours and a mix of sweet and sassy sentiments! If you haven't already got your hands on some of this... JUST. DO. IT.   
(You can check out all the new goodies in the Flutterby shop HERE)


To create this layout I started with a fun photo of hubby and I taken at a 'Pimps & Hoes' fancy dress party last year and that STUNNING background paper - aptly named 'Love Potion', from the 'Happily Ever After' 12x12" paper pack. The pack contains 10 different sheets of patterned paper which are all printed on 200gsm paper, making them ideal for mixed media as well.


I used a variety of the Everyday Etc filler cards cut into various shapes and sizes to create a layered mat for my photo. (I so love the colour palette of this collection!) I then added some frayed gauze for a little soft texture before placing my photo on top.


I added two of the 'Happily Ever After' page tabs above my photo, which I just tucked in behind it.

I decided my page needed some extra details on the background, so I used the new 'Happily Ever After' stencil and some black Staz On ink to add the love you words and hearts. To do this, I simply masked off the areas around the section I wanted to use with some washi tape and then applied the ink using a sponge dauber.


Next, I turned my attention to my page title - reaching for my pack of Everyday Etc cards. I already knew EXACTLY which quote I wanted to use for my title because...well, why not? hehe I fussy cut it out and adhered it below my photo. (Hubby thought it was hilarious!)


After my title was down, I looked to add a few extra embellishments. (I didn't need a lot because the papers did most of the work on this page.) I wanted to create a little cluster on the horizontal strip to the right of my photo, so I added the I'm not sick of you yet sticker and the small purple heart sticker from the Sticky Quotes sheet.


I also added a handmade purple heart from Charms Creations; which I topped with the XOXO flair button from the 'Happily Ever After' set #1. I also added a few small torn pieces of the 'XO' washi tape that comes in the 'Happily Ever After' Kit (not available separately).

To finish off my page, I added a few splatters of white Flutter Colour paint (I watered it down slightly to make it easier to splatter); then stamped the date and a few phrases and I was done.

Thanks for stopping by today so I could share this with you. I am sure you are dying to get your hands on the 'Happily Ever After' collection for yourself, so make sure you head to the shop HERE now to grab some!
Util next time, happy scrapping! X

Friday 18 May 2018

You Make My Heart Sing | Cocoa Vanilla Studio


Hi everyone!
Following on from my previous post about my upcoming classes at the Brisbane Scrapbook Expo using the 'Wild at Heart' collection from Cocoa Vanilla Studio; comes this sweet little off the page project I created using the very same collection.


Having created one of these frames before, I knew I already had a spare one in my stash cupboard that I had also conveniently pre-primed with some Colour Blast white heavy gesso. So when mojo hit me to create something different to a layout, it was simply a matter of pulling out the embroidery hoop, finding a photo and reaching for my Cocoa Vanilla Studio supplies.


I used a pic of my sister and I together and drew on the blue tones from the photo to inspire my colour scheme. I used a variety of die cut ephemera pieces including a printed doily, bow, flowers, leaves and butterflies. 


I framed the photo using one of the chipboard frames, (which I trimmed down slightly on the left corner to fit). I added the together sticker from the accessory sticker sheet onto my frame.


To tie in the timber theme more, I also added some hearts from the wood veneer words pack and then a few scattered enamel dots (sparkles). The final embellishment I added was the you make my heart sing chipboard accent sticker.
I then took a tiny bit of Colour Blast 'Just Blue' Colour Paste on my finger tip and rubbed it into the frame to give it a blue tint. 

Thanks for stopping by so I could share this with you today.
Don't forget to check my previous posts with all the details of the three classes I have coming up at the Brisbane Scrapbook Expo for Cocoa Vanilla Studio next month. If you have any questions about any of my classes, don't hesitate to ask!
Until next time, happy scrapping! X

Thursday 17 May 2018

"Wild Side" Class | Brisbane Scrapbook & Papercraft Expo


Hi everyone! 
Here's the details of the final class I will be teaching at this year's Brisbane Scrapbook & Papercraft Expo! (If you missed the details of the other two, make sure you check out the details of my 'Boys Rule' class and 'Bohemian Rhapsody' class)
Today I I am sharing some sneak peeks and information about my "Wild Side" class with you.

Date: Thursday 7th June (one session only!)
Time: 2.30pm - 4.30pm


Participants in this class will be working with the beautiful 'Wild at Heart' collection from Cocoa Vanilla Studio to create two layouts. Kits include assorted papers; die cut ephemera; stickers; chipboard stickers; flair buttons and enamel dots.


The class will also incorporate some simple but effective mixed media techniques to add that extra little "something" to each of the layouts. (Don't be afraid, you won't get messy!) 
Participants will need to bring their basic tool kit including paper trimmer and craft mat; double sided tape; 3D foam adhesive; and photos.

Photos required:
- 3 x 3x4" (portrait) - B&W or colour (note colours used if using colour)
- 1 x 4x6" (landscape) - B&W or colour (B&W preferred)
*Tip* print photos with borders or mat with white cardstock to really help them pop


This is the only session that this class will be held and places are strictly limited, so ensure you book early to avoid disappointment.

To book a place, head directly to the booking page here:  https://expertiseevents.eventsair.com/scrapbook-papercraft-expo-2018/classes/Site/Register

If you have any questions about the class or requirements, please don't hesitate to contact me. Click HERE to email me or you can message me via my Sue Plumb Designs Facebook page
(I will be sharing sneaks from the two other classes I will be teaching soon.)
Hope to see you there! X

Tuesday 15 May 2018

Even the Prettiest | Colour Blast


Hi everyone! Popping in today with my most recent design team project for Colour Blast, and I have another spread in my altered book art journal to share. (I did warn you there would be more!) For this one, I again reached for my favourite product - Colour Artist Inks, along with white heavy gesso and Colour Paste. I just love the colour and vibrancy of these inks!

Here's a look at the full spread...


As you can see, I used a super pretty blue / pink / purple colour palette; and a variety of techniques including watercolour, stencilling, layering, collage, and stamping to achieve my result. (Which I love!) I will take you through my full step-by-step process so you will be able to try it too - bear with me, as I have lots of photos to share.

I started by laying down a coat of white heavy gesso on my pages. This primed my pages and ensured they were ready for the mediums I was going to apply. I used an old gift card to scrape the gesso across the paper which ensured a thin, even coat. (I didn't want the gesso too thick, as I still wanted to be able to see the book text underneath.)


Next, it was time to apply some colour using 'Oasis' and 'Slipper' Colour Artist Inks. I started with the 'Oasis' and simply brushed the inks onto random areas of my page, using extra water to help move the ink around. Once I was happy with the coverage, I dried it off using a heat gun. (That is how I achieved the "water lines" you can see in the ink. If you prefer a softer look, leave the inks to air dry.)


Once the 'Oasis' had dried, I simply repeated the process with the 'Slipper' ink; using it to fill the gaps I had left earlier, whilst also layering it over the blue in some places. (Again, I achieved the strong "water line" effect by drying with a heat gun.)


Next, it was time to add some layers! I used the fabulous 'Deconstructed Floral Bouquet' stencil from StencilGirl, along with black Staz On ink and a sponge to apply some floral details to several areas of my page. (I love the way this technique adds a layer, but still allows the layers underneath to show through.)


Once the stencilling was complete I then decided where my focal image and quote were going to be placed, then used my finger to apply some white heavy gesso to each area. (Don't be afraid to get your hands dirty - fingers really do make the best brushes!)


I then added my feature quote (which was from the Flutterby Designs 'We Run the World' collection); along with some Flutterby Designs phrase stickers and my focal image (which was cut from a magazine). As the theme of my page was about being flawed, I took the opportunity to "modify" my image by cutting off one of the model's arms, and by rubbing back the paper on one side of her face.


At this point, my page was looking like this...


It was now time to start adding some texture. I hit on the idea of using up a (very) old supply I had lurking in my cupboard - flat paper flowers. I used many of these when I first began scrapping all those years ago, but they have laid dormant and unused in my cupboard for a long time; so I thought this would be a good way to use some of them up.
I used the "visual triangle" principle of design ad stuck them in 3 clusters on my page using a multi matte medium. (I brushed the flowers down as flat as I could and layered them together.)


After the flowers were applied I decided my page need a little extra "something", so I used 'Lovely Lilac' Colour Paste to add a small smear to the centre of the flowers using a thin palette knife, and then I also added some random smears around my page with the excess.


To help my focal image and quote stand out a little more from the background, I used a water brush filled with 'Soot" Colour Artist Ink to add some shadowing around the outside of them. I also used a correction pen to add some white highlights to my flower petals. (Thank you Lisa Oxley for the tip!)


To finish off my page I used my 'Doodle Dots' stamp from Viva Las VegaStamps to add a little stamping to a few areas of my page.


And with that, my page was done! I hope you have enjoyed seeing my entire process and that it might inspire you to try recreating your own version of it.

Here's a couple close up shots of the finished spread...


Thanks for stopping by so I could share this with you. 
Until next time, happy scrapping! X